Introduction
Since iOS 15 (09/2021), Apple has opened the door to Safari extensions on iPhone and iPad, offering mobile users features similar to those on desktop. Developing a Safari extension on iOS makes it possible to enrich navigation (content blocking, service integrations, custom UIs, etc.) while reusing web technologies.
However, creating an iOS Safari extension has some specificities compared to traditional extensions (Chrome, Firefox or even Safari desktop). The extension should be distributed within an iOS application (via the App Store), not as a standalone package.
In this article, we'll show you how to use React to build and deploy your own iOS Safari extension in just a few steps.
Sneak peek of the final architecture
Architecturally, an iOS Safari extension is essentially based on the following 5 files:
manifest.jsondescribing in particular the permissionsbackground.jsfor background logiccontent.jsWho is injected into the pagespopup.jsWhat is the interface of the extensionSafariWebExtensionHandler.swiftwhich acts as an interface between the native application and the extension
Our goal is to exploit the possibilities offered by React, and to make sure that everything is transformed into these 5 files!

Setting up the project
Creating the “Extension” project in Xcode
We assume that we already have an existing iOS application. To integrate a Safari extension, go to File > New > Target... and seek Safari Extension.
.png)
Xcode then adds a new Target for the extension, in addition to the existing target of the application. The structure of the project includes:
- A file
Resources/with the initial files of a web extension - A class
SafariWebExtensionHandler.swiftimplementing the protocolNSExtensionRequestHandlingwhich allows you to receive and process messages from JavaScript code.
.png)
At this point, the JS files generated by default would be fine for a basic extension. In our case, we are going to generate a React application in a folder separate from the Xcode project (for example dummy-extension-react-app/) then we will transform it into a set of files that can be understood by the extension.
Delete all files in the folder Resources/ except manifest.json, we will replace them later.
Creating the React application
We will use a modern web stack to facilitate UI development: React, Fast (for the build), and TypeScript. Although an extension can be coded in Vanilla JS, using this stack allows us to benefit from a better DevX (Developer eXperience) in building a complex project.
Initialize the React project with Vite
Create the extension scripts
Adapt the Vite configuration
Adapt the manifest.json
At this point, when executing the command NPM Run Build, when we look at the Xcode file explorer, we see something that looks like ↓
.png)
In Xcode, there are two ways to reference folders and files: folders & groups (cf. Xcode Folders & Groups for more information). As the last step of the implementation, we apply the following distribution for the various folders & files:
- For source code → groups
.png)
- For resource files (images, assets, JSON, etc.) → folders 💙
.png)
For the file of Assets, check that the location is Relative to Group, and add the extension in the Target Membership if necessary. Apply Once to Folder and add the extension in the Target Membership if necessary. This allows us to embed the files in this folder in our application.
.png)
Now, you can remove references to folders that are not essential to the operation of the extension, without actually deleting them from your hard drive.
Let's remove references to folders .idea and DummyExtensionReactApp. This changes the file project.pbxproj and makes it possible not to have to repeat the operation during development.
.png)
React application injection
After bundling, a React app comes down to these elements: assets, a JS file that manages the logic, a CSS file for styles, and a Div for rendering. We use the extension's ability to manipulate the DOM via a content script which runs in the context of the web page to inject both:
- One
Divwith a unique ID (anchor point for React). - The JS script (React bundle) that mounts the application in this
Div. - Les CSS styles associates.
Change the application entry point
We want to have iso behavior between our local environment and our browser that displays the extension. At the local entry point index.html, we will now use our content script as an entry point and make sure we create the root div for our application.
Inject the div and mount the application via our content script
Now, we will create the same div that corresponds to the extension container in the browser's web page.
Concretely, we will use our extension content script as an entry point to create the react div, inject the generated style sheet and the associated script into it.
We're changing our script Content.tsx as follows:
The manifest.json is configured so that the script and the style sheet are loaded by the extension as follows:
We regenerate our static files with the command NPM Run Build.
Two things can be observed:
npm run devwill launch the application locally by injecting the content of our fileindex.htmlusing our script.NPM Run BuildWill re-generate our artifactsContent.bundle.cssandContent.bundle.js. These are the files that are the entry point to the extension.
.png)
Isolate CSS styles from the extension
If you try to visualize your extension on your browser at this stage, you will see that the style of the web page is influenced by the style of our extension. Conversely, the style of our React application is impacted by the styles of the web page!
Style isolation is crucial to avoid conflicts between the extension and the website. Since HTML/CSS is injected into the page, there is a risk of conflict between the styles of the extension and those of the website.
We have two options for isolating styles:
- Using an iframe to wrap the container, which has the advantage of completely isolating styles but using it adds complexity
- Integrate the container div directly and manually isolate application styles
Instead of using an iframe, we opt for direct integration with precautions:
- Reset CSS to root : Apply
#dummy -extension-root * {all: initial;}at the start of your style sheet - Limit selectors : Prefix all selectors with #root in order to encapsulate them (
#dummy -extension-root * {...}) - Prefix CSS classes (ex:
Extension-with Tailwind) to make them unique.
⚠️ It is not complete isolation, which can lead to inconsistencies with external interactions.
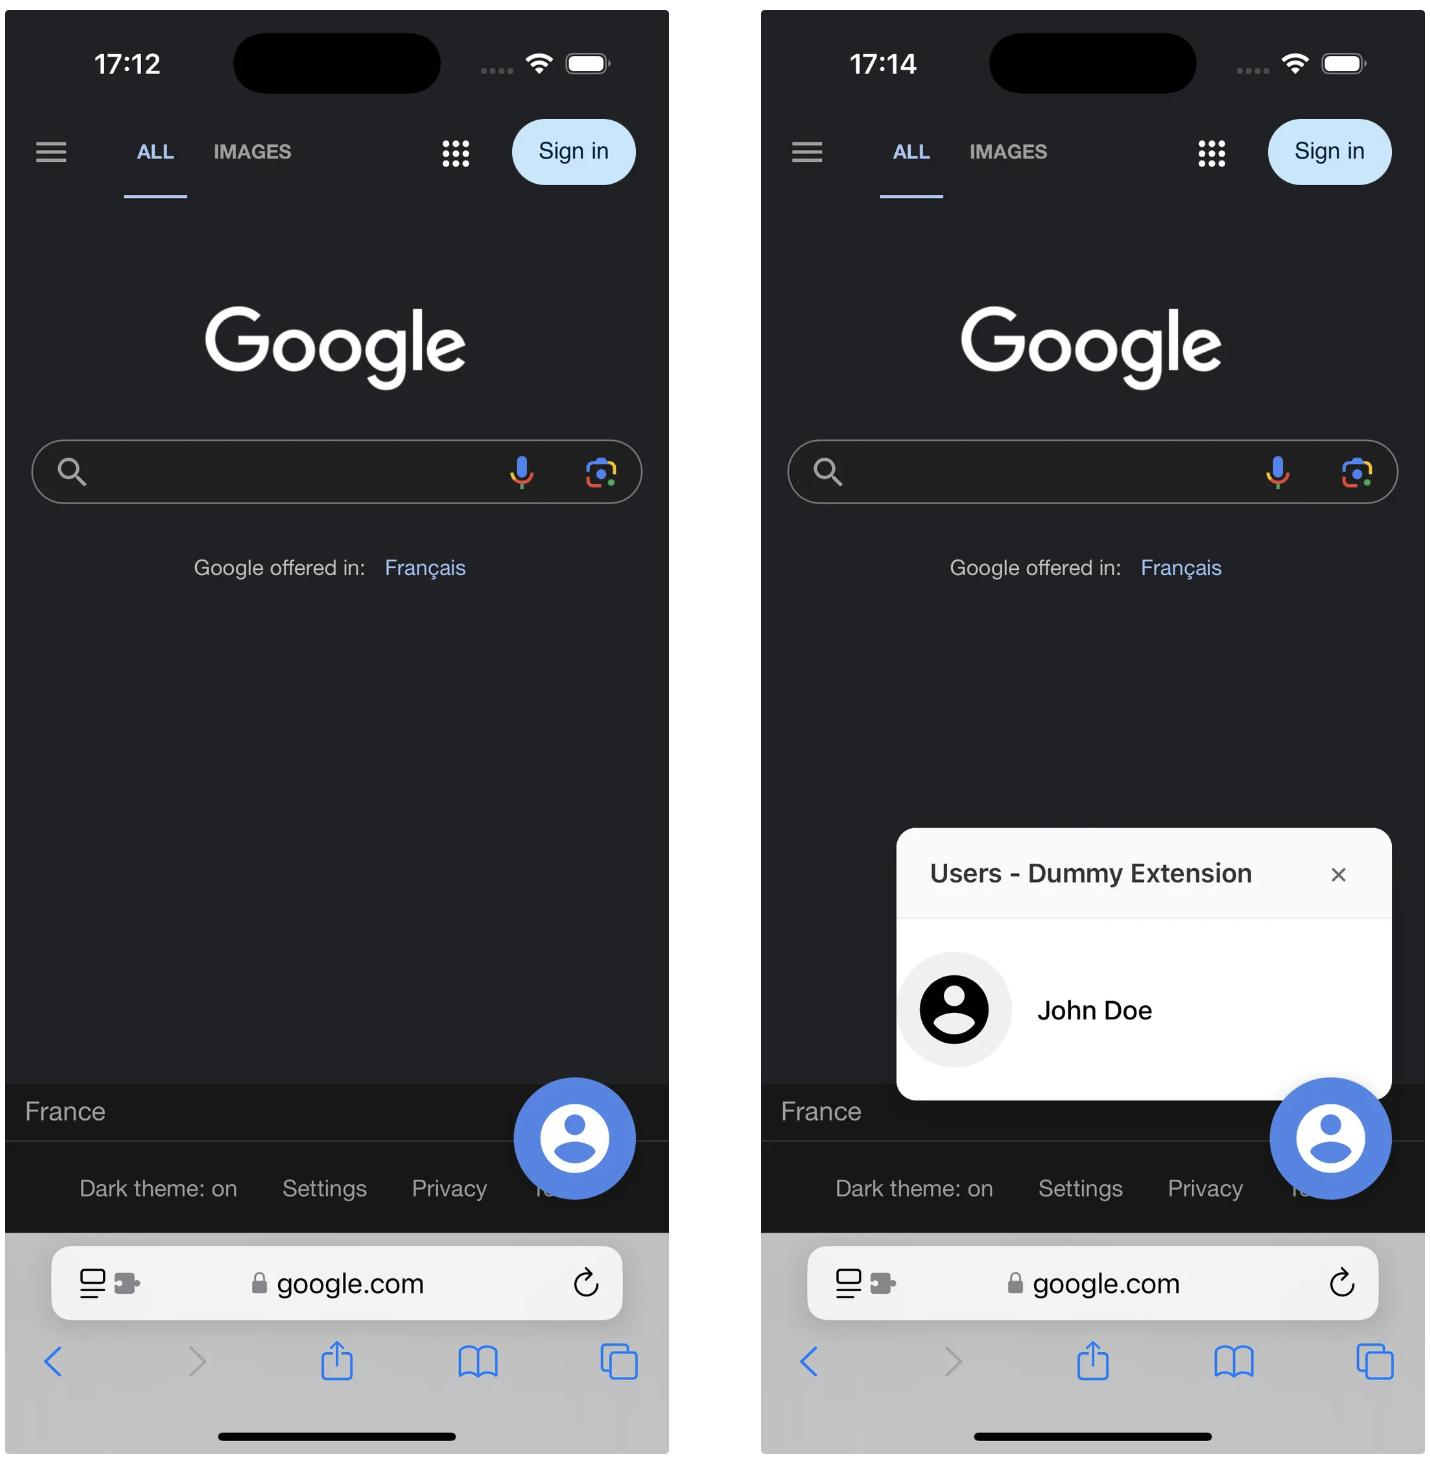
Communication between the React app, the extension, and the native app
Let's say your native application stores user data and you want to pass it on to the extension. The entry point to the native implementation is the file SafariWebExtensionHandler.swift with the following content:
You can think of this code as an API with an endpoint GetUserInfo that returns data in the form {"firstName”: “John”, “lastName”: “Doe"}.
We will carry out an end-to-end communication from our React application located in the DOM of the web page to the native application.
Edit file App.tsx to post the event of a request and listen to its response:
Edit the content script Content.tsx to make the request to the background script and return its response:
Finally, modify the background script background.ts to send a native message to the iOS application and return the result:
When the button is clicked, our React application sends a request that will be listened to by our content script Content.tsx. It also waits for a response asynchronously. If the content script detects that a request is being made, it forwards that request to the background script background.ts, then possibly to the iOS application via the SafariWebExtensionHandler. Once the response is retrieved, the content script sends the data back to the React component, which listens to it and updates the user interface. The name is then displayed on the screen 🎉.
Visually, here is the diagram representing the code we just wrote:
.png)
We have therefore seen how to implement end-to-end communication to allow information to be retrieved and native code methods called.
Now, you can go further by considering native features like biometric checks that can be directly called up through your extension.
Hot-reload and debugging
Once the build is done, you want to deploy the application on an iOS device (real or simulator), then activate the extension in the Safari settings before testing it in real conditions. Here are our developer experience best practices.
During the UI development phase, it is possible to test the React application outside of the extension at first. We can execute npm run dev to see the interface and quickly iterate over the design and behavior of the components.
.png)
Then, to test the real integration in Safari, you can use the iOS simulator via Xcode.
.png)
You must then activate the extension on Safari ↓
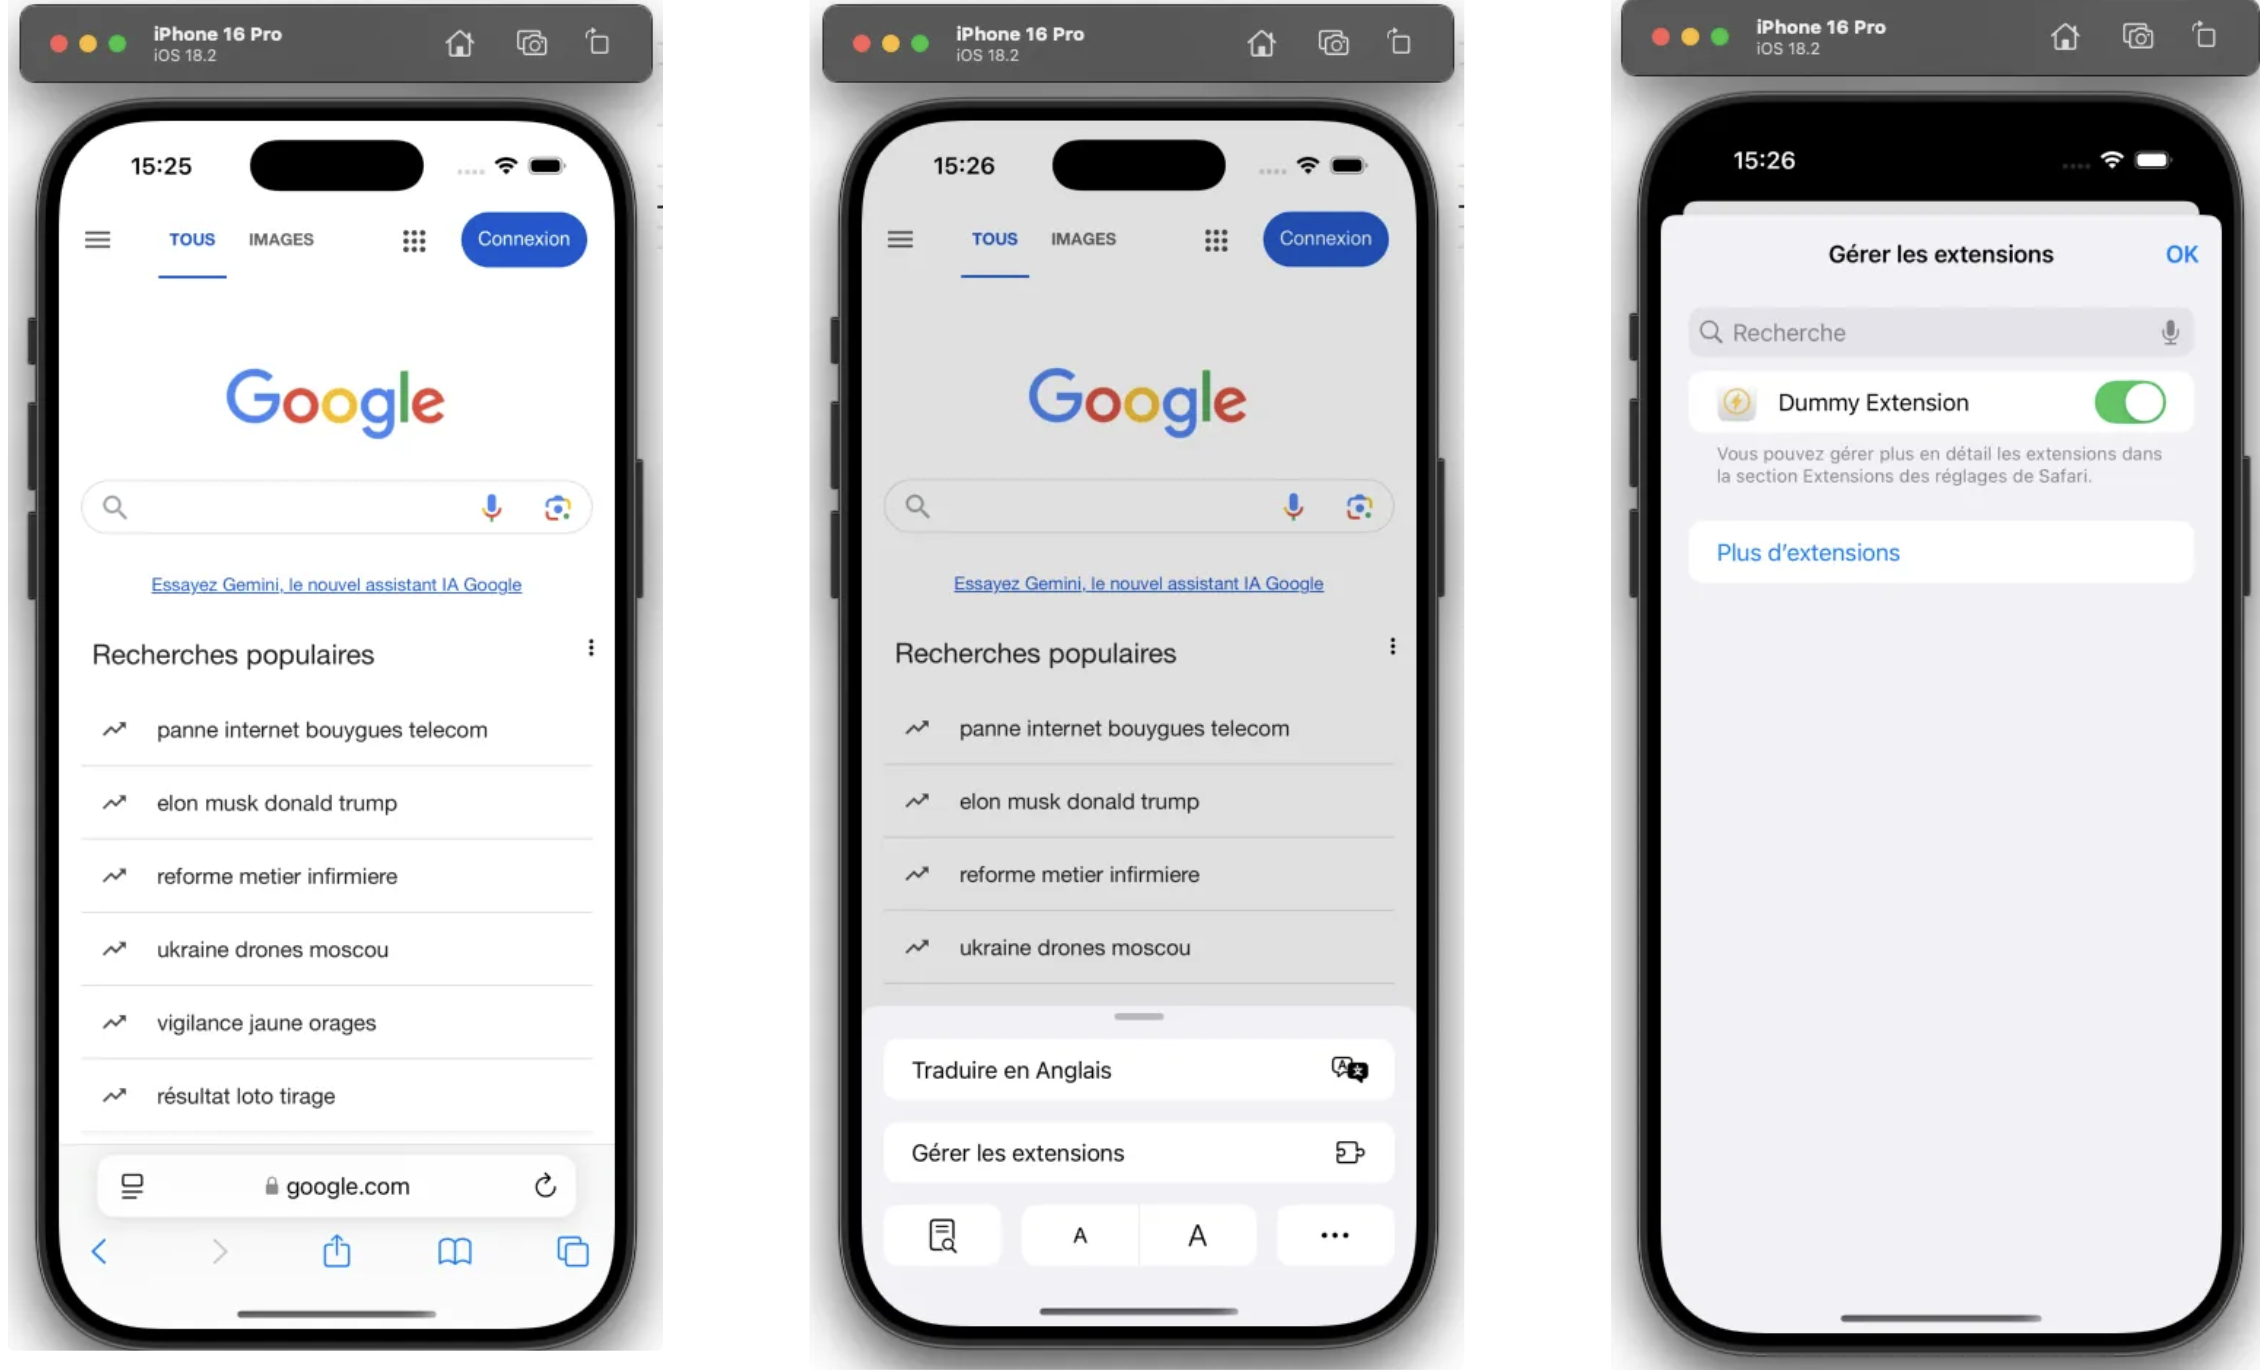
Every time we bundle the React application via NPM Run Build, then when you build the application from Xcode, Safari loads the new version of the extension.
It's slower than Vite's HMR, but you can reduce friction by scripting the reconstruction as much as possible. For example, we set up a pre-commit hook with Husky That triggers a NPM Run Build after each commit.
PS: You don't need to re-activate the extension on Safari after re-building the project on Xcode.
Finally, for live debugging on iOS, use Safari Web Inspector after activating the tab Development (cf. https://support.apple.com/en-mz/guide/safari/sfri20948/mac).
.png)
You will have access to the page's JS console, which includes your extension logs, and you can inspect the DOM, including your injected portion.
Distinction of execution contexts
When developing a web extension, it is important to understand the contexts in which our code runs. In our case, we mainly have three contexts:
- The context of the web page :
- The code of our React application is injected directly into the DOM of the web page. It can freely manipulate the HTML structure and CSS styles of the page, but does not have access to any API specific to the extension (e.g.
browser.runtime,browser.storage, etc.). To communicate with the scripts specific to the extension, it must pass through messages via the APIWindow.postMessage.
- The code of our React application is injected directly into the DOM of the web page. It can freely manipulate the HTML structure and CSS styles of the page, but does not have access to any API specific to the extension (e.g.
- The context of the content script :
- This script injected by the extension also runs in the web page but in an isolated JavaScript context. It has direct access to the DOM of the page, while having access to some specific APIs of the extension (for example
browser.runtime.sendMessageandbrowser.storage).
- This script injected by the extension also runs in the web page but in an isolated JavaScript context. It has direct access to the DOM of the page, while having access to some specific APIs of the extension (for example
- The background script context :
- The code running in this context has special privileges. It can make full use of extensions-specific APIs, like
browser.tabs,browser.storage.
- The code running in this context has special privileges. It can make full use of extensions-specific APIs, like
.png)
We must then see our React application as a box injected into the DOM with which the content script can only communicate via messages. In the same way, the communication between the content script and the background script respects the classic rules of extension communication.
So you have to know the APIs available depending on the context.
- The React application can only communicate via messages via the API of
Window. She won't be able to call the API directlybrowser.runtime.getUrl (””). - The content script can call some of the extension APIs (ex:
browser.runtime.sendMessage,browser.storagecan be accessed directly, etc.) It does not have access to APIs reserved exclusively for the background context, such as those that allow you to directly manipulate tabs (browser.tabs). - The background has no direct access to the DOM of web pages and must go through content scripts to perform any direct interaction with them.
Additional configurations
Our experience developing an extension was not without obstacles and we learned a lot about the particularities of this technology. There are several bottlenecks to consider when developing an extension. We have summarized the problems we have encountered and the solutions or points of attention for each, which will be essential if you decide to start developing an extension on iOS.
Read extension images and resources
- Problem: Some resources can either be loaded directly as Data URI (
data:image/...) or via a path to a separate file (assets/icon.svg). By default, Vite integrates small files (less than 4 kB), set by default by vite with the build configuration.AssetsInlineLimit) directly in the bundle (Data URI), but larger files remain separate. The latter must necessarily be part of theweb_accessible_resourcesto be retrieved and are subject to the CSP of the web pages. - Point of attention:
- Images encoded with Data URI can be imported and read without being configured in the manifest, as they are directly present in the JS code. For the other images in the tab Network, inspect network requests to confirm that large files are loaded successfully (status
200 OK). - You cannot use import syntax
import image from”. /assets/image.png”on separate files in your bundle, it will cause an errorSyntaxError: import.meta is only valid inside modulesbecause extension content scripts don't support EsModule syntax today. You must retrieve the path of the url of your extension with for examplebrowser.runtime.getUrl (” assets/image.png “)and explain this path as a source to be able to access larger files. - If your image should be retrieved from the React extension by writing the path directly (for example for conditional displays), vite will not bundle your resource automatically and you should use the same logic when placing your resource in the folder
public/assets. In this case the image will necessarily be separated? from the bundle and can be read.
- Images encoded with Data URI can be imported and read without being configured in the manifest, as they are directly present in the JS code. For the other images in the tab Network, inspect network requests to confirm that large files are loaded successfully (status
.png)
Setting up Xcode references with the file project.pbxproj
- Problem : On iOS, the extension files must be integrated into the Xcode project and properly referenced in the file
PBXPROJ. Otherwise, the mobile application cannot know that these files exist. - Point of attention :
- Verify that the files in the
manifest.jsonare consistent with the structure of the Xcode project, and that they are referenced correctly (found in theproject.pbxproj). For example, this is very important if you decide to add new content scripts to your extension.
- Verify that the files in the
.png)
- You may see an error
Failed to load resource: The requested URL was not found on this server.despite a correct path to a resource and a good manifest configuration; this probably means that the file was not properly embedded in the mobile app build
.png)
Background script not persisting
- Problem:
- Background scripts (Background) cannot Don't stay persistent on iOS with the Manifest V3. Deploying the application will fail if this condition is not met.
- Solution:
- We need to set up our background as a service worker in the
manifest.jsonas follows:
- We need to set up our background as a service worker in the
Bundler in IIFE to avoid duplicate variable errors due to the minification of several content scripts
- Problem :
- If several content scripts are injected into the same page, they may conflict if global variables or functions have the same name (especially after minification). For example, two scripts could define a variable
var a = 10;, which would cause errors.
- If several content scripts are injected into the same page, they may conflict if global variables or functions have the same name (especially after minification). For example, two scripts could define a variable
- Solution :
- We use a plugin that will bundle our scripts with IIFE syntax (Immediately Invoked Function Expression) to encapsulate the code for each script in a local scope. This avoids global variable conflicts in the context of the web page. We add this configuration to the file
quick.config.ts:
- We use a plugin that will bundle our scripts with IIFE syntax (Immediately Invoked Function Expression) to encapsulate the code for each script in a local scope. This avoids global variable conflicts in the context of the web page. We add this configuration to the file
You now have all the keys in hand to develop a Safari extension on iOS from start to finish.
If you want to discover more articles written by our talented colleagues at Theodo Fintech, it's 🎯 hither Let it happen!
Repository Github
To experiment, we have provided a Github repository that includes the steps described above.
If you have any questions, do not hesitate to contact us via Github or the following email addresses and we will be happy to answer them:
mahdi.lazraq@theodo.com
gabriela.bertoli@theodo.com

